
If you've encountered moire patterns in your photos and you're an Affinity Photo user, you already know the frustration: Affinity Photo has no dedicated moire removal tool. Unlike Photoshop's Camera Raw moire slider or Lightroom's Adjustment Brush with built-in moire reduction, Affinity Photo requires creative workarounds using its existing filter set.
This guide covers three practical methods to remove moire in Affinity Photo, explains exactly when each works best, and introduces a faster AI-powered alternative for cases where manual editing falls short.
Need a quick fix? Upload your image to our AI Moire Remover and get results in seconds—no manual filter stacking required. For screen photography specifically, try our Screen Moire Remover.
Quick answer: Affinity Photo lacks a one-click moire removal tool. The most effective manual method is the FFT Denoise filter (Filters > Noise > FFT Denoise), which targets specific frequencies where moire patterns live. For mild moire, Gaussian Blur combined with layer masking works well. However, all manual methods require significant time and skill—AI moire removal tools process the entire image automatically in seconds with superior results, especially for screen photography and scanned documents. Read on for detailed step-by-step instructions.
Why Doesn't Affinity Photo Have a Moire Tool?
This is the elephant in the room. When Serif launched Affinity Photo V2 in November 2022, many photographers hoped for a dedicated moire reduction feature—similar to what Adobe offers in Lightroom and Photoshop Camera Raw. That didn't happen, and as of Affinity Photo 2.x in 2026, there's still no built-in moire slider.
The Affinity community has been vocal about this. Forum threads dating back years show users requesting a simple moire adjustment, particularly for:
- Fashion and product photography with fine fabric textures
- Screen photography showing rainbow interference patterns
- Scanned printed materials with halftone dot patterns
Without a dedicated tool, Affinity Photo users must rely on general-purpose filters repurposed for moire removal. Here are the three most effective approaches.
Method 1: FFT Denoise Filter (Most Effective)
The FFT (Fast Fourier Transform) Denoise filter is Affinity Photo's closest equivalent to a moire removal tool. It works by converting your image into the frequency domain, where repetitive patterns like moire become visible as distinct bright spots that can be selectively removed.
When to Use This Method
- Repetitive, regular moire patterns (fabric weaves, screen pixel grids)
- Scanned printed materials with halftone dot patterns
- Situations where the moire has a consistent frequency across the image
Step-by-Step Process
Step 1: Duplicate Your Background Layer
Before applying any destructive filter, always create a safety copy. In the Layers panel, right-click your background layer and select Duplicate. Work on this duplicate so you can always revert.
Step 2: Open the FFT Denoise Filter
Navigate to Filters > Noise > FFT Denoise. You'll see a frequency domain representation of your image—this looks like a pattern of bright and dark spots on a dark background.
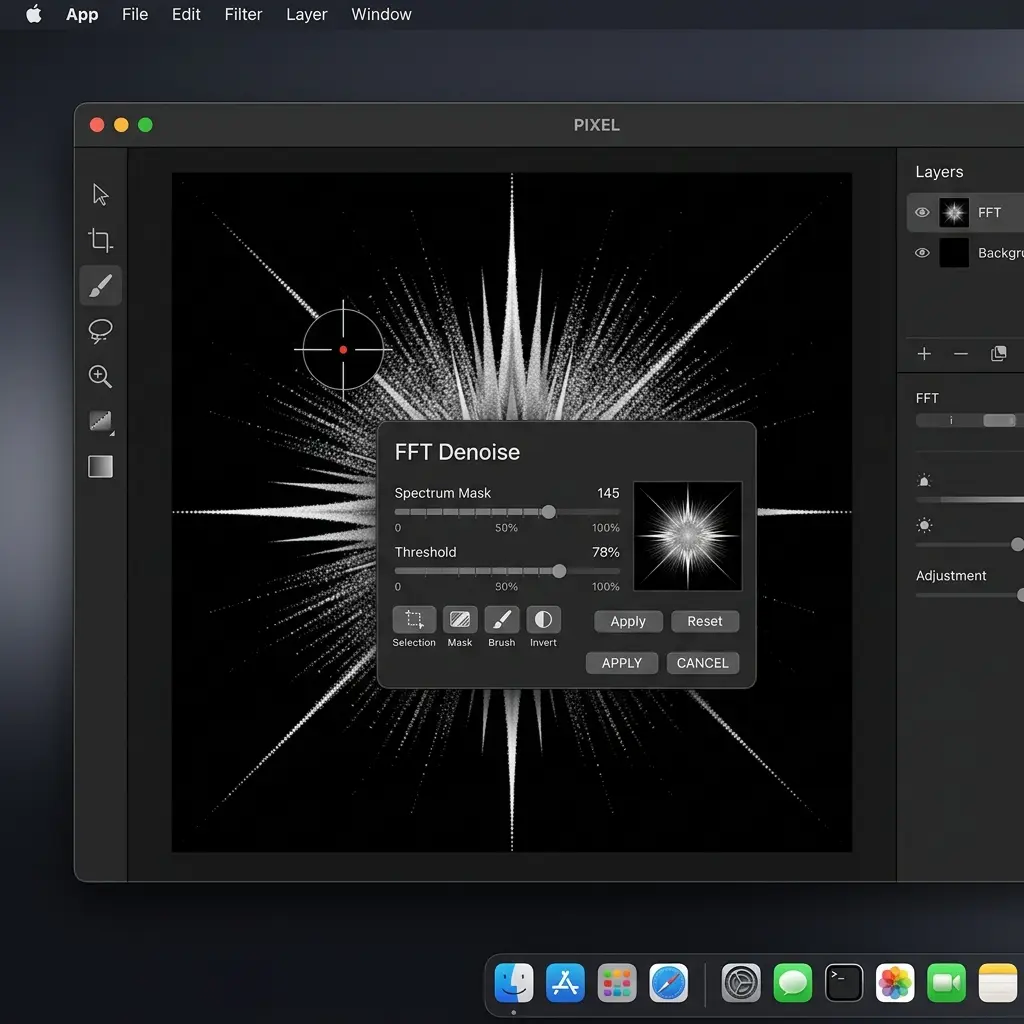
Step 3: Identify Moire Frequencies
In the FFT view, moire patterns appear as bright spots or clusters arranged symmetrically around the center. These represent the specific spatial frequencies causing the interference pattern. Regular moire from fabric or screens typically shows as distinct pairs of bright dots.
Step 4: Paint Out Moire Frequencies
Using the built-in painting tool within the FFT dialog, carefully paint over the bright spots that correspond to the moire pattern. Be precise—removing too many frequencies will blur your image, while missing the moire frequencies won't fix the problem.
Tips for FFT painting:
- Start with the most obvious bright spots furthest from the center
- Work symmetrically—if you remove a spot on the left, remove its mirror on the right
- Avoid painting over the central bright area (this contains essential image data)
- Use a small brush size for precision
Step 5: Apply and Evaluate
Click Apply and zoom to 100% to check your results. Compare the before and after by toggling the duplicate layer's visibility.
Limitations of FFT Denoise
- Steep learning curve: Understanding frequency domain representation takes practice
- Destructive edit: The filter directly modifies pixel data (hence the duplicate layer)
- Inconsistent moire is problematic: If the moire pattern varies across the image (common with curved surfaces or varying angles), a single FFT pass won't catch everything
- Risk of artifacts: Removing the wrong frequencies introduces blur or ringing artifacts
- No preview: You can't see the spatial result until after applying the filter
Method 2: Frequency Separation Technique
Frequency separation splits your image into a high-frequency layer (texture and detail) and a low-frequency layer (color and tone). Since moire patterns often live in the high-frequency layer, you can target them without affecting overall color.
When to Use This Method
- Moire that primarily appears as texture interference rather than color banding
- Situations where you need to preserve color accuracy (product photography)
- Mild to moderate moire in localized areas
Step-by-Step Process
Step 1: Duplicate Your Background Layer
Right-click your background layer and select Duplicate to create a working copy.
Step 2: Apply Frequency Separation
With the duplicate layer selected, go to Filters > Frequency Separation. In the dialog, set the Radius to a value that blurs away the moire pattern—typically 2-8 pixels depending on moire size. Click Apply.
Affinity Photo will automatically split your image into two new layers:
- High Frequency: Contains texture and fine detail (where moire often lives)
- Low Frequency: Contains color and tonal information
Step 3: Edit the High Frequency Layer
Select the High Frequency layer. Use the Clone Brush Tool (K) or Healing Brush to paint over the moire patterns on this layer. Since it contains only texture information, your edits won't affect the underlying colors. You can also apply a gentle Filters > Blur > Gaussian Blur selectively on moire-heavy areas of this layer.
Step 4: Optionally Edit the Low Frequency Layer
If the moire also appears as color banding (common with screen photography), select the Low Frequency layer and smooth out any remaining color artifacts using the Healing Brush or a soft Clone Brush.
Step 5: Flatten and Evaluate
Merge the layers (Layer > Flatten) and check your results at 100% zoom. The moire should be reduced while colors and overall detail remain intact.
Limitations of Frequency Separation
- Radius selection is critical: Wrong radius value will either leave moire intact (too low) or destroy useful detail (too high)
- Partial solution for color moire: Rainbow-colored moire (common in screen photos) exists in both frequency layers, making it harder to isolate
- Manual retouching required: After separation, you still need to manually paint over moire on the high frequency layer
- Different areas may need different treatment: Uniform results across the whole image are hard to achieve
Method 3: Gaussian Blur + Layer Masking
This is the simplest approach and works well for mild, localized moire patterns.
When to Use This Method
- Mild moire limited to small, well-defined areas
- Quick edits where precision isn't critical
- As a finishing touch after FFT or frequency separation
Step-by-Step Process
Step 1: Duplicate Your Layer
Create a copy of your background layer.
Step 2: Apply Gaussian Blur
On the duplicate, apply Filters > Blur > Gaussian Blur. Start with a radius of 1.5-3.0 pixels. You want just enough blur to eliminate the moire pattern.
Step 3: Add a Black Mask
With the blurred layer selected, add a mask and fill it with black (hiding the entire blurred layer). You can do this by clicking the mask icon and then inverting it, or painting the mask entirely black.
Step 4: Paint White on the Mask
Select a soft white brush and paint on the mask only over the moire-affected areas. This reveals the blurred version precisely where you need it, leaving the rest of the image sharp.
Step 5: Adjust Opacity
Fine-tune the result by adjusting the blurred layer's opacity. Values between 60-85% often produce the most natural blend.
Limitations
- Destroys detail: Blur inevitably softens textures in treated areas
- Ineffective for severe moire: Strong patterns need more than simple blurring
- Manual and tedious: Large affected areas require extensive mask painting
- No color moire handling: Won't address rainbow interference patterns
When Manual Methods Aren't Enough: The AI Alternative
All three Affinity Photo methods share common limitations: they're time-consuming, require significant skill, and struggle with certain moire types—particularly the rainbow interference patterns from screen photography and complex multi-directional moire from scanned materials.
AI-powered moire removal tools take a fundamentally different approach. Instead of manually manipulating frequencies or layers, neural networks trained on large datasets of moire examples can:
- Detect moire automatically across the entire image
- Distinguish moire from legitimate texture (fabric weave, paper grain)
- Remove color and luminance moire simultaneously in one pass
- Process images in 5-15 seconds instead of 15-30 minutes
- Handle screen photography that manual methods consistently fail on
How to Use AI Moire Removal
- Upload your image to the appropriate tool:
- Screen Moire Remover for photos of monitors, TVs, and phone screens
- Fabric Moire Fix for clothing and textile photography
- Descreening Tool for scanned magazines and printed materials
- Moire Pattern Remover for general moire removal
- Select output resolution (1K for web, 2K standard, 4K professional)
- Wait 5-15 seconds for AI processing
- Download your clean result
No layer stacking. No frequency domain analysis. No manual mask painting.
When to Use Affinity Photo vs AI Tools
| Scenario | Affinity Photo | AI Tools |
|---|---|---|
| Mild fabric moire, small area | ✅ FFT or Blur+Mask | ✅ Works but overkill |
| Severe fabric moire, full image | ⚠️ Time-intensive | ✅ Fast and effective |
| Screen photography (rainbow moire) | ❌ Poor results | ✅ Specifically trained |
| Scanned documents (halftone) | ⚠️ FFT can work | ✅ Descreening tool |
| Batch processing (50+ images) | ❌ Not practical | ✅ Batch upload |
| Already in Affinity workflow | ✅ Convenient | Requires export/import |
Tips to Prevent Moire When Shooting
Prevention is always better than correction. These techniques can reduce or eliminate moire at capture time:
Camera Settings
- Aperture: Use wider apertures (f/2.8-f/5.6) to reduce the resolving of fine patterns
- Focal length: Change your focal length slightly—sometimes switching from 50mm to 55mm eliminates the interference
- Focus: Slightly defocusing on fabric subjects can break up the pattern alignment
Shooting Technique
- Angle adjustment: Shift your camera angle by 2-5 degrees relative to patterned surfaces
- Distance variation: Move slightly closer or farther from your subject
- Multiple exposures: Shoot several frames with tiny position changes—one may be moire-free
For Screen Photography
- Adjust screen brightness: Higher brightness can reduce moire intensity
- Change screen refresh rate: If shooting video or using electronic shutter
- Use a polarizing filter: Can help reduce reflection-based interference
Frequently Asked Questions
Does Affinity Photo have a built-in moire removal tool?
No. As of Affinity Photo 2.x (2026), there is no dedicated moire removal slider or filter. Unlike Adobe Lightroom (which has a Moire slider in the Adjustment Brush) or Photoshop (which has moire reduction in Camera Raw), Affinity Photo requires users to work with general-purpose tools like FFT Denoise, Gaussian Blur, and frequency separation techniques to address moire patterns. This has been a long-standing feature request in the Affinity community.
What is the best method to remove moire in Affinity Photo?
The FFT Denoise filter is generally the most effective manual method for moire removal in Affinity Photo. It directly targets the spatial frequencies where moire patterns exist, allowing you to remove interference while preserving most image detail. However, it has a steep learning curve and requires understanding frequency domain concepts. For simpler cases, Gaussian Blur with layer masking is faster and easier. For the fastest and most consistent results across all moire types, AI-powered tools outperform all manual Affinity Photo methods.
Can Affinity Photo remove screen photography moire (rainbow patterns)?
Affinity Photo struggles significantly with screen photography moire. The rainbow interference patterns from LCD, LED, and OLED displays involve complex multi-channel color interactions that don't respond well to FFT Denoise or frequency separation. These techniques were designed for simpler, single-frequency patterns like fabric weaves. For screen photography moire, AI tools specifically trained on thousands of screen photo examples produce dramatically better results. Try our Screen Moire Remover for this specific use case.
Is FFT Denoise destructive in Affinity Photo?
Yes, the FFT Denoise filter applies changes directly to pixel data—it's a destructive edit. Always work on a duplicate layer so you can revert if the results aren't satisfactory. Unlike Lightroom's non-destructive Adjustment Brush, changes made through FFT Denoise cannot be undone once the file is saved and closed (unless you maintained the duplicate layer).
How does Affinity Photo compare to Photoshop for moire removal?
Photoshop has a clear advantage for moire removal thanks to its Camera Raw Filter with a dedicated Moire Reduction slider—a feature Affinity Photo lacks entirely. Photoshop also offers more sophisticated frequency separation tools and the Content-Aware Fill system that can help in some moire situations. However, both programs share the same fundamental limitation: manual methods are slow and struggle with screen photography moire. AI tools outperform both for speed and consistency. For a detailed Photoshop comparison, see our Photoshop moire removal guide.
Will Affinity Photo add a moire removal feature in the future?
There's no official confirmation from Serif (Affinity's developer) about adding a dedicated moire removal tool. The feature has been requested on the Affinity forums for years, and users expressed disappointment when Affinity Photo V2 launched without it. While Serif actively develops new features for each update, moire removal doesn't appear on any public roadmap. In the meantime, the workaround methods in this guide and AI-powered alternatives remain the best options for Affinity Photo users.
Conclusion
Affinity Photo is a powerful, affordable photo editor—but moire removal isn't its strength. Without a dedicated tool, you're left with creative workarounds: FFT Denoise for frequency-based patterns, frequency separation for texture-level moire, and Gaussian Blur masking for simple cases.
For Affinity Photo users who regularly encounter moire—especially in screen photography, product photography, or document scanning—AI moire removal tools provide dramatically faster and more consistent results. They handle the types of moire that manual Affinity Photo methods consistently struggle with.
Our recommendation:
- Use Affinity Photo's FFT Denoise for occasional, mild moire in an existing workflow
- Switch to AI tools for screen photography, severe patterns, batch processing, or when manual methods aren't working
- Consider a hybrid workflow: AI removal first, then final touches in Affinity Photo
Ready to skip the manual work? Try our AI Moire Remover for instant, automatic moire removal—no frequency domain expertise required.
Related Resources
- GIMP moire removal guide — Free methods for GIMP users
- Photoshop moire removal guide — Compare Photoshop's 3 methods
- Lightroom moire removal guide — Adjustment Brush tutorial
- Complete guide to fixing moire patterns — All methods compared
- Understanding moire patterns — Learn what causes moire
- Screen Moire Remover — AI tool for screen photography
- Fabric Moire Fix — Specialized for textile photography
- Descreening Tool — For scanned printed materials
This guide was written by the Moire Lab team — image processing specialists focused on moire pattern removal. All methods are tested in Affinity Photo 2.x on macOS and Windows with real-world photography scenarios.
