
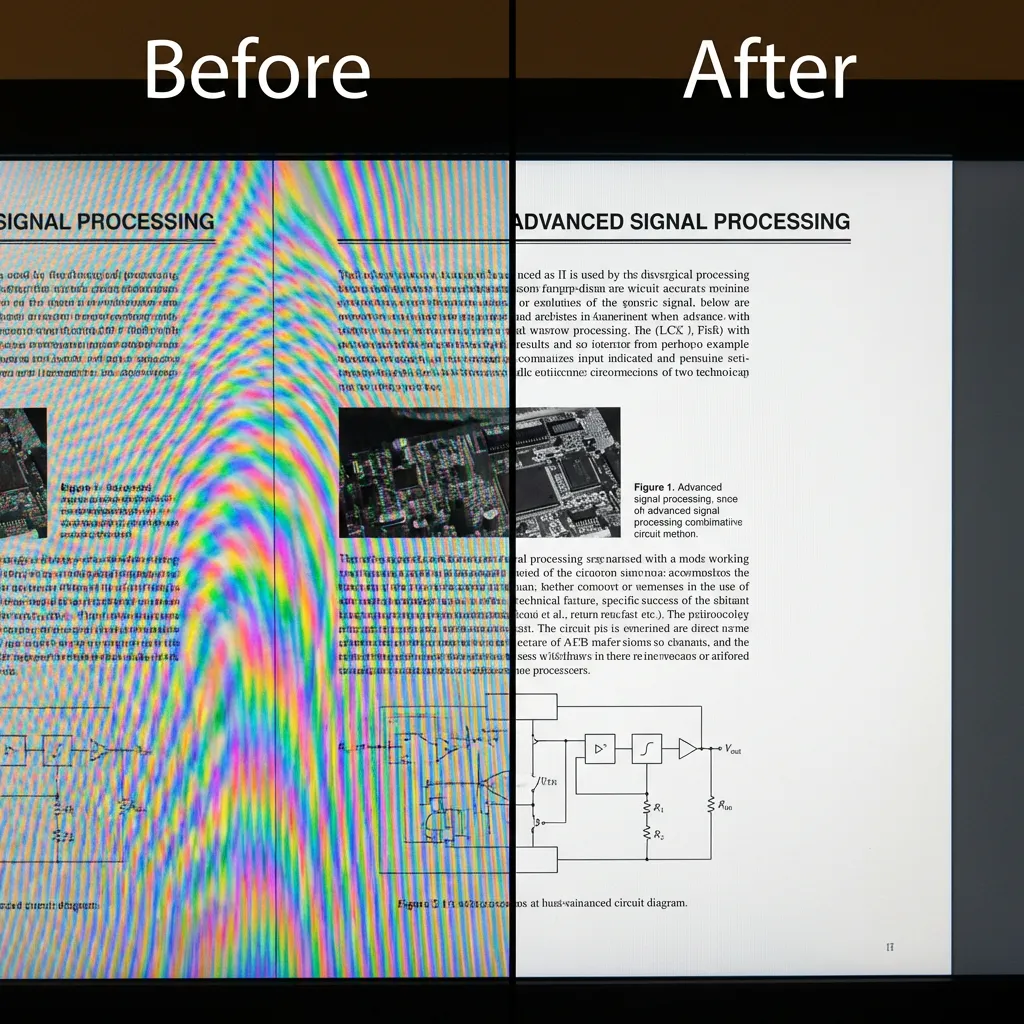
Moire patterns are those annoying wavy lines, rainbow-like interference, or grid artifacts that appear when you photograph screens, scan printed materials, or shoot fine-patterned fabrics. If you've ever wondered how to fix moire in your photos, you're not alone—it's one of the most common image quality issues photographers and content creators face.
In this comprehensive guide, we'll compare 4 popular methods to fix moire patterns: Lightroom, Photoshop, video editing software, and AI-powered tools. By the end, you'll know exactly which method works best for your specific situation.
Need a quick fix? Upload your image to our AI Moire Remover and get instant results. For specific cases, try our Screen Moire Remover for monitor photos or Fabric Moire Fix for clothing.
Quick answer: The fastest way to fix moire is using AI-powered tools—just upload your image and download the result in 10 seconds, no technical skills required. For mild fabric moire in RAW files, Lightroom's Adjustment Brush (5-10 min) works well. Photoshop offers more control but requires 10-30 minutes per image. Screen photography moire (rainbow patterns from monitors/TVs) is extremely difficult with traditional tools but AI handles it effortlessly. For detailed comparisons of all 4 methods with step-by-step instructions, read on below.
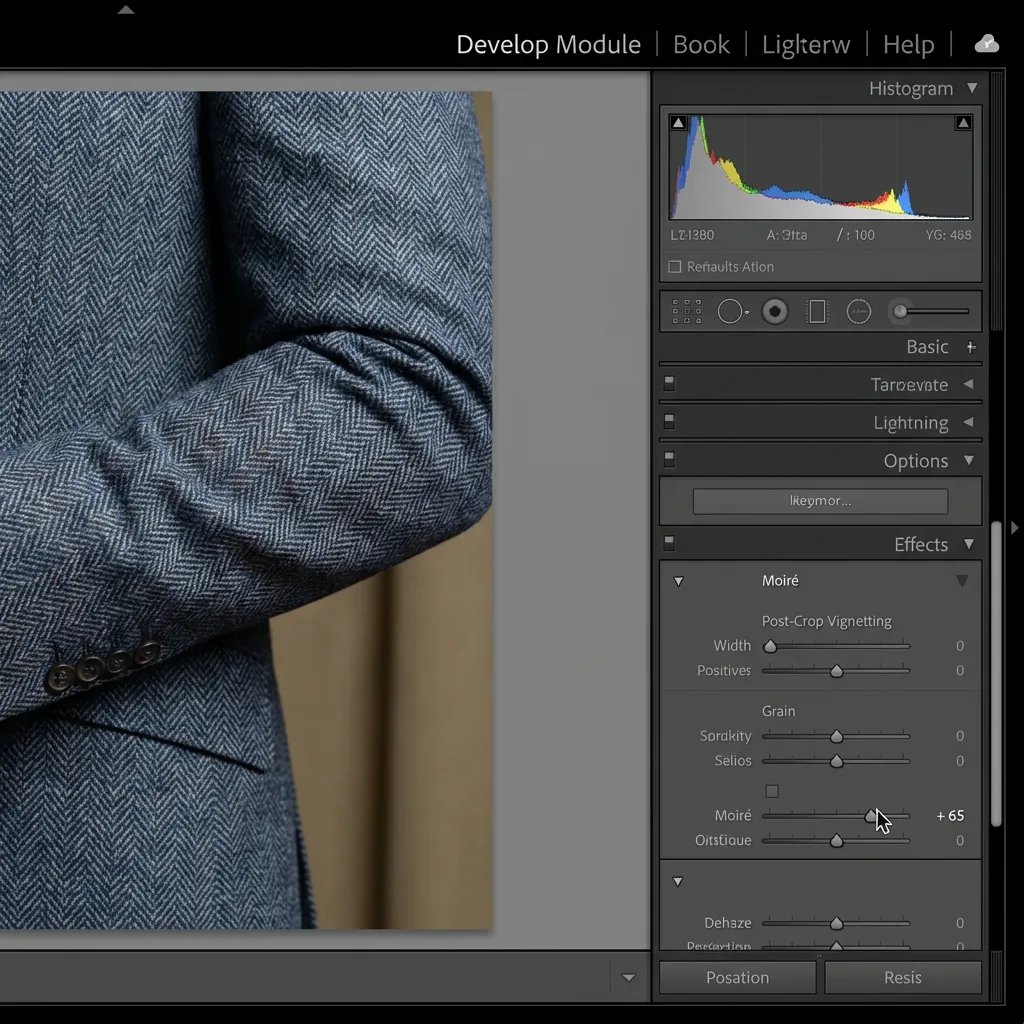
Fix Moire in Lightroom
Lightroom offers a built-in moire reduction tool that works well for RAW photos with mild interference patterns.
When to Use Lightroom
- Processing RAW files from your camera
- Portrait or fashion photography with fabric moire
- Mild moire patterns that don't cover the entire image
Step-by-Step Instructions
- Open your photo in the Develop module
- Select the Adjustment Brush tool (K shortcut)
- In the brush settings, find the Moire slider
- Set the Moire value between 25-100 depending on severity
- Paint over the affected areas carefully
- Fine-tune with the Amount slider if needed
Pros and Cons
Advantages:
- Non-destructive editing
- Integrates with your RAW workflow
- Precise local adjustments with brush
Limitations:
- Only effective for mild moire
- Poor results on screen photography moire
- Requires manual painting of affected areas
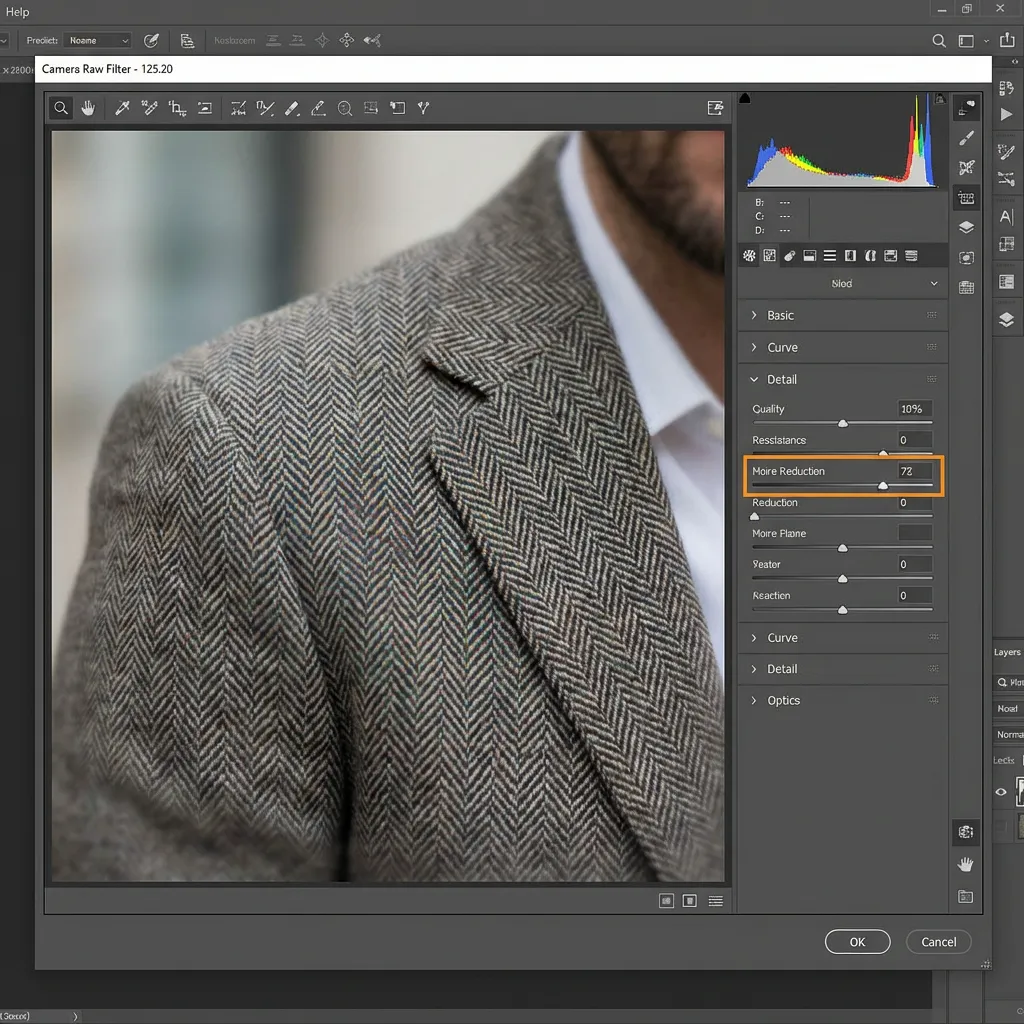
Fix Moire in Photoshop
Photoshop provides more powerful options for stubborn moire patterns, with multiple techniques available.
Method A: Gaussian Blur + Blend Mode
This classic technique works by blurring the color information while preserving detail:
- Duplicate your background layer (Ctrl/Cmd + J)
- Apply Filter > Blur > Gaussian Blur (2-5 pixels)
- Change the blend mode to Color
- Add a layer mask and paint to reveal only affected areas
- Adjust layer opacity for fine-tuning
Method B: Camera Raw Filter
For more control, use the Camera Raw filter:
- Convert your layer to a Smart Object
- Go to Filter > Camera Raw Filter
- Select the Adjustment Brush
- Enable the Moire Reduction slider
- Paint over the moire-affected areas
- Click OK to apply
Pros and Cons
Advantages:
- Fine-grained control over the result
- Multiple techniques to choose from
- Works on any image format
Limitations:
- Steep learning curve for beginners
- Time-consuming for large affected areas
- May require multiple attempts to get right
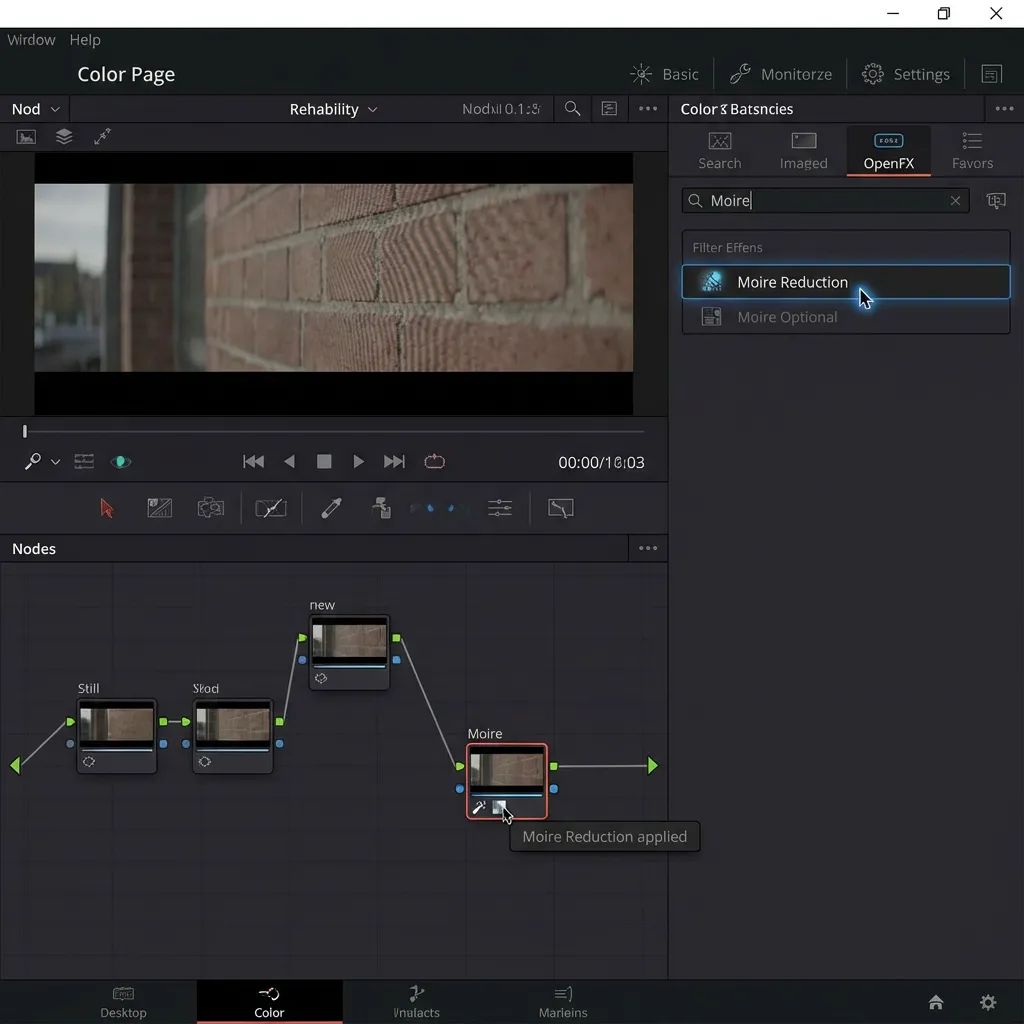
Fix Moire in Video Software
If you're dealing with moire in video footage, dedicated video editing software offers specialized tools.
DaVinci Resolve
DaVinci Resolve includes a dedicated moire reduction effect:
- Import your footage and add it to the timeline
- Go to the Color page
- In the Effects library, search for "Moire"
- Apply the Moire Reduction OFX effect
- Adjust the Strength and Radius parameters
Premiere Pro
Adobe Premiere Pro doesn't have a native moire tool, but you can:
- Use Effect > Video Effects > Blur & Sharpen > Reduce Interlace Flicker
- Or install third-party plugins like RE:Vision Effects DE:Noise
- Apply and adjust parameters to taste
Best For
- Video recordings of screens or monitors
- Footage with fine fabric patterns
- Screen recordings with visible pixel grid
Fix Moire with AI Tools (Recommended)
For the fastest and most effective results—especially for screen photography—AI-powered tools are the clear winner. Unlike traditional methods that blur away detail, AI tools are specifically trained to recognize and remove moire patterns while preserving image sharpness.
Why Choose AI Tools?
- One-click processing: No technical skills required
- Purpose-built models: AI trained specifically on moire patterns
- Best for screen photos: Handles rainbow interference that other tools can't fix
- Preserves detail: Removes moire without destroying image quality
How to Use
- Upload your image to the AI tool
- Select the appropriate mode:
- Screen mode for photos of monitors, TVs, or phone screens
- Fabric mode for clothing and textile patterns
- Scan mode for printed materials with halftone dots
- Wait a few seconds for AI processing
- Download your moire-free result
Try These AI Tools
Depending on your specific moire type, try these specialized tools:
- Screen Moire Remover - Best for photos of screens, monitors, and TVs
- Fabric Moire Fix - Ideal for clothing and textile photography
- Descreening Tool - Perfect for scanned magazines and newspapers
Method Comparison
Here's how all the methods stack up:
| Method | Difficulty | Time Required | Effectiveness | Best For |
|---|---|---|---|---|
| Lightroom | Medium | 5-10 min | ⭐⭐⭐ | RAW photos, mild moire |
| Photoshop | High | 10-30 min | ⭐⭐⭐⭐ | Complex edits, precise control |
| Resolve/Premiere | Medium | 5-15 min | ⭐⭐⭐ | Video footage |
| AI Tools | Easy | 10 seconds | ⭐⭐⭐⭐⭐ | Screen/fabric/scan moire |
Frequently Asked Questions
Which method is fastest?
AI tools are by far the fastest moire removal option, requiring only 10-20 seconds from upload to download. There's no learning curve, no manual brushing, no layer management, and no parameter tweaking—just upload your image, select the moire type (screen/fabric/scan), and download your corrected result. In contrast, traditional software methods require significant manual work and time investment: Lightroom typically takes 5-10 minutes of careful brush painting per image, Photoshop's Camera Raw method takes 10-15 minutes, and advanced Photoshop techniques like Frequency Separation can require 20-30 minutes. For batch processing multiple images with similar moire issues, AI tools offer even more dramatic time savings—processing 50 images in 2-3 minutes versus hours of manual work in Lightroom or Photoshop.
Which method gives the best results?
The best moire removal method depends on your specific moire type and requirements. For screen photography moire (rainbow interference from LCD/LED monitors, TVs, or phone screens), AI tools deliver dramatically superior results—traditional Lightroom and Photoshop methods struggle with the complex multi-channel interference and often produce washed-out colors or fail completely. For mild fabric moire in RAW files, both Lightroom and AI tools work well, though AI is faster and more consistent. For complex cases requiring precise manual control—like high-end fashion photography where you need to preserve specific fabric textures while removing interference—Photoshop's Frequency Separation method offers the most granular control, though it requires advanced skills and significant time. For scanned printed materials with halftone patterns, specialized AI descreening tools or Photoshop's frequency-based methods work best.
Are there free options?
Yes, several free options exist for moire removal. Adobe Lightroom and Photoshop both offer 7-day free trials, giving you full access to their moire removal features during the trial period—useful if you have a one-time moire issue or occasional need. AI moire removal tools typically offer free processing credits or a limited number of free images (usually 1-5) so you can test the results before committing to a paid plan. Some AI tools offer completely free processing for low-resolution outputs. DaVinci Resolve is entirely free (with an optional paid Studio version) and includes basic moire reduction effects for video footage. For photographers on a budget dealing with occasional moire, the combination of free trials plus free AI tool credits can handle many situations without any payment required.
How do I fix moire in video?
For video moire removal, use dedicated video editing software with built-in effects. DaVinci Resolve (free) includes a dedicated Moire Reduction OFX effect in the Color page—simply apply the effect and adjust Strength and Radius parameters to taste. Adobe Premiere Pro doesn't have a native moire tool, but you can use the "Reduce Interlace Flicker" effect under Blur & Sharpen, or install third-party plugins like RE:Vision Effects DE:Noise. For severe video moire that software effects can't handle adequately, try this hybrid workflow: export the most problematic frames as still images, process them through AI moire removal tools to get clean versions, then replace those frames in your timeline. This frame replacement technique works particularly well for static or slow-moving shots with extreme screen moire.
Can I prevent moire when shooting?
Yes, moire can often be prevented or minimized during shooting with proper technique, though complete prevention isn't always possible. Change your shooting angle by just 2-5 degrees from perpendicular to break the grid interference between the camera sensor and the subject pattern. Adjust your distance to the screen or fabric—moving closer or farther changes how the pattern maps to your sensor and can eliminate moire entirely. Use a wider aperture (lower f-number like f/2.8-f/4) to create slightly softer focus that reduces pattern interference, though this trades some overall sharpness. Modify screen settings like brightness, contrast, or refresh rate to alter the display characteristics. Shoot in RAW format for maximum post-processing flexibility if moire does appear. Test multiple frames from different angles and distances before shooting an entire series, checking at 100% zoom to identify moire-free setups.
Conclusion
Moire patterns don't have to ruin your photos. While traditional tools like Lightroom and Photoshop can handle mild cases, AI-powered tools offer the fastest and most effective solution—especially for screen photography moire that other methods can't touch.
For quick, professional results without the learning curve, try our AI Moire Remover and fix your photos in seconds.
Related Resources
- Remove moire from screen photos - Screen photography guide
- Understanding moire patterns - Learn what causes moire
- Remove moire in Lightroom - Lightroom tutorial
- Screen Moire Remover - AI tool for screen photography
- Fabric Moire Fix - Specialized for textile photography
- Descreening Tool - For scanned printed materials
This guide was written by the Moire Lab team — image processing specialists who have helped remove moire patterns from over 100,000 photos since 2023. All methods are tested with real-world images across multiple devices and software versions.
